To set up Appium for mobile automation on a Mac, follow the below steps:
1. Install Homebrew (if not already installed): Homebrew simplifies the installation of software packages on macOS.
- Please find Homebrew and follow the instructions on this website: https://brew.sh/
- OR: Open Terminal and run
- /bin/bash -c “$(curl -fsSL https://raw.githubusercontent.com/Homebrew/install/HEAD/install.sh)”
- Verify the installation: brew -v
2. Install Node.js and NPM: Appium requires Node.js to run. You can install it using Homebrew.
- Run: brew install node
- Verify Node.js installation:
- node -v
- npm -v
3. Install Appium: You can do this in one of the following ways
- Install Appium Desktop. If you prefer a GUI, you can install Appium Desktop, which provides an inspector and server control:
- Download it from: Appium Desktop
- Install the .dmg file and follow the setup instructions.
- Please note Appium Desktop is not supported any more.
- Install Appium with npm package, so you can install it globally. Run in Terminal:
- npm install -g appium
- To check if Appium was installed correctly, run: appium -v
4. Install Java Development Kit (JDK) & Set (JAVA_HOME)Environment Variable:
- Follow steps through this video: https://shorturl.at/48BnN
5. Install Xcode (for iOS automation): Xcode is required for iOS development and testing
- Download Xcode from the Mac App Store.
- Install Xcode Command Line Tools: xcode-select –install
- Accept the Xcode license: sudo xcodebuild -license accept
- Open Xcode and create a dummy project to ensure proper setup of necessary components (like the simulators).
6. Install Android Studio (for Android automation): For Android automation, you need Android Studio and SDKs.
- Download and install Android Studio
- Install Android SDK and create at least one emulator.
- Note: When installing, make sure to select the Android Virtual Device component.
7. Configure AndroidStudio and Android SDKs
- Start AndroidStudio.
- In the Welcome dialog box, select Configure > SDK Manager. This will open the SDK Manager dialog box:
- On the SDK Platforms tab, select the SDKs that you will need for testing.
 Select at least one SDK.
- Switch to the SDK Tools tab and make sure the following tools are selected there:
- Android SDK Build-toolsNote:Select the latest available version.
- Android SDK Platform-Tools
- Intel x86 Emulator Accelerator (HAXM installer)
- On the SDK Platforms tab, select the SDKs that you will need for testing.
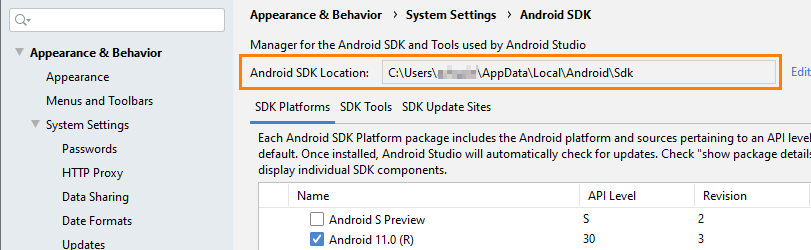
- Copy the value of the Android SDK Location box at the top of the SDK Manager dialog. We will need this value later:
-
- Now you need to specify the path to Android SDKs in the
ANDROID_HOMEenvironment variable. To do this, open the .bash_profile (same way we did for JAVA_HOME ) OR .zshrc in an editor and add the following lines to it:- export ANDROID_HOME=$HOME/Library/Android/sdk
- export PATH=$PATH:$ANDROID_HOME/emulator
- export PATH=$PATH:$ANDROID_HOME/platform-tools
- Restart the Terminal to get changes made to your .bash_profile. Run the following command to ensure it does not cause an error:adb
- (Optional) You can also run Appium Doctor to see if anything else requires configuring before you start testing: appium-doctor
8. Configure WebDriverAgent for iOS: Appium uses WebDriverAgent (WDA) to automate iOS devices.
- Clone WebDriverAgent: git clone https://github.com/appium/WebDriverAgent
- Open the project in Xcode, sign it with your Apple Developer account, and build it for iOS devices.
9. Install Maven
- Run the following command in the Terminal: brew install maven
- Check the maven version : mvn -version
- Set Environment Variable for Maven: Follow the steps through below video
- OR: Open your .bash_profile OR .zshrc file in an editor and add the following line to it:
- export PATH=”/usr/local/Cellar/maven/version-number/bin:$PATH”
- To get the version-number, go to /usr/local/Cellar/maven/. Look at the names of subdirectories there. These are available versions. Select the version you need.
10. Start Appium Server:
- Once everything is installed, start the Appium server, run: appium
- Note: This will start the Appium server, which listens on port 4723 by default.
11. Verify Installation with Appium Doctor: Appium provides a tool called Appium Doctor to verify your setup.
- Install Appium Doctor:
- npm install -g appium-doctor
- Run Appium Doctor for iOS
- appium-doctor –ios
- Run Appium Doctor for Android:
- appium-doctor –android
12. Configure Environment Variables (for ease of use) for Node & Appium
- Open
~/.bash_profileor~/.zshrcand add:- export PATH=$PATH:/usr/local/bin/node
- export PATH=$PATH:/usr/local/bin/appium
After setting up Appium and ensuring all dependencies are correctly installed, you’re ready to start writing and running mobile automation tests on iOS and Android devices!

